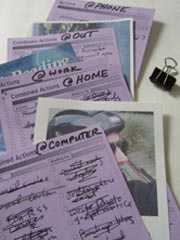
For those who have no idea what I’m talking about, the Hipster PDA (HPDA) is basically a stack of index cards held together with a binder clip. My understanding is that it started out at 43 Folders as a playful jab at the expense, complexity and battery-dependence of our electronic gadgets. But the concept has turned out to be so useful the HPDA has developed an enthusiastic following. Some people trick them out with fancy hardware (like colored cards) and software (printed templates) but the soul of the HPDA is just a stack of index cards in your pocket.
The Hipster PDA is an ideal environment for personal ads. You probably already have cards in your stack for to-do lists, notes, and maybe a calendar. To start advertising just include a couple more cards with motivational messages or pictures on them. Once you have “installed” an ad, you will likely encounter it several times a day as you flip through your cards. Of course it’s ridiculously easy to move ads cards in and out of the stack, and I change them frequently to keep it fresh.
Many people use their Hipsters for a Getting Things Done (GTD) implementation, although that’s not necessary. (The rest of this paragraph will not make sense unless you’re a GTD geek.) I keep a Next Actions card in my HPDA for each context. I mix my ad cards in with those Next Action cards so that each time I change contexts I encounter my advertising messages. It works great.
There are several methods to make ads for your HPDA. I’ve had good results with all of them:
1. Write
Consider including cards in your HPDA that remind you of your important long-term goals. Depending on the philosophy that resonates with you that might include things like a list of your goals, values, ideal scenario, quarterly plan, roles, mission statement, 5 year plan, etc. The point is to write these big picture objectives down and then use your Hipster to keep them close at hand.
For important goals that you want to emphasize, make an ad for each one on its own card. This can be as simple as writing an affirmation on a blank 3 x 5 card. For short text ads like this I like to use a fine-point Sharpie pen for its bold clarity. Check out How to write an effective ad on a Post-It note for tips about how to compose your message.
2. Draw
Illustrating your ad is optional, but it’s fun and very effective. Even if you don’t fancy yourself to be much of an artist, the act of trying to draw a representation of your goal will activate parts of your brain that may not usually get on board when you’re working on that project. Colored pencils work well, since crayons tend to smear on the other cards in your stack. I usually use unlined cards for illustrated ads.
3. Paste
A pair of scissors and a glue stick can boost your 3 x 5 ads to the next level by adding color and realism. Cut out a picture for your ad from a newspaper, magazine, photograph, or photocopy. Or cut out a picture you have downloaded and printed from your computer. Use a glue stick to paste the picture on the 3 x 5 card. I often just use pictures in my HPDA as-is, but it can also be very effective to add advertising “copy” (written text). You can add text with a Sharpie, as we did in #1, or paste cut-out words on the card ransom-note style.
4. Print
This method is definitely the most complex but it’s worth trying because you can produce ads that feel very “real”. As conditioned as we are to commercial advertising, I’ve noticed that a slick professional appearance gives them an aura of authority.
First you need to create your ad in a software program that can manipulate both pictures and text. There are a number of ways you could do this. Page layout software like PageMaker or InDesign would work well. So does graphic software like PhotoShop or Illustrator. You could even use a word processor like Microsoft Word. I recommend using whatever program you are used to. The specifics about how to operate each of those programs is beyond the scope of this article, but here are some general tips:
- Set your page size to 3″ by 5″.
- Use about 1/4″ margins.
- Import your picture and size it down to fit your layout.
- Create a text box and type in your message.
- Adjust the font size as needed.
- Choose a font style that is appropriate to your message.
For those who use PhotoShop, here are a couple of templates to get you started:
Printing these ads can be a little tricky. There was a great discussion over at 43 Folders awhile back about printers that can handle 3 x 5 cards. I ended up getting the Canon iP4000 and love it. It does a great job printing both my ads and D*I*Y templates. The current model is the Canon iP4300.
The Printer Properties settings I use for printing 3 x 5 cards on my Canon iP4000 are:
- Media type: Plain paper
- [X] Preview before printing
- Page size: 4 x 6 (3 x 5 is not available, but this works)
- Printing type: Borderless printing
- Amount of extension: Lowest setting
Sometimes it’s necessary to make some adjustments in the page layout software as well. The most common tweaks needed are to adjust the margins or uncheck a setting that tries to center the printed image on the page. It will takes some experimenting the first time, so you’ll probably want to write down the settings that work. If your printer is not able to handle 3 x 5 cards or the settings are not working out, just go ahead and print your ads on 8-1/2″ x 11″ paper and cut them out.
Regardless of the method you use to produce them, these advertising cards make a really nice addition to your Hipster PDA.

2 Comments
This is fabulous, thanks.
For years I’ve bought the 3×5 Day Timer “compact edition” wallets with a simple 3×5 coil pad to plan my actual day, the planner itself for scheduled events.
It’s the only planner I’ve ever liked because it fits in my back pocket and I’ve ALWAYS got it with me. Plus, no batteries.
Used to carry a telephone directory but with cell phones and computers, don’t bother.
I can’t believe I never thought of printing goals and affirmations on 3×5 cards.
I have a Brother Laser Multi-function copier MFC 7820N with 1/4 inch margins. It works like a charm and to format, I use the free OpenOffice.org suite.
Starting like 10 min. ago!
Tonight I also installed the Google Desktop with the rotating images at the top, reminding me of my important dream… to be with the woman I love in Australia.
http://lovingjacqui.net/
We’ve been together recently, but I’ve got off track with a new business.
I’m going to use your systems to focus.
Underneath the pictures of her and our life together which change at 15 sec. intervals, I have the quotes module with my affirmations rotating randomly at 6 second intervals.
Beneath that, the Google “To Do” module with my list of goals to be checked off as accomplished.
Underneath that, the Scratch Pad for ideas that come up. I’ll set goals/affirmations once per week, and put any ideas I have here (or on scrap pieces of paper in my new Hipster PDA).
I looked everywhere for binder clips… and by God, I have them.
This is entirely perfect. Thanks for all the great ideas and I’ve bookmarked your excellent site!
Oh, speaking of ads… I placed the rotating text and image ads on the LEFT… since it’s a proven fact that advertising on the left of a page gets a higher response.
Magazines charge a premium for it! So for me, the important things go there.